
One of the biggest challenges I faced when switching from being a chef to food styling was the waste. Not the oh, this is moldy let’s throw it out waste, but this strawberry is too darn big or that bun has a little dimple on one side or the pith of this lemon is a quarter of an inch too thick or this slice of swiss cheese doesn’t have enough holes to read as swiss cheese. Some of these defects you can change or manipulate. Not enough holes in the swiss cheese? No problem, get out your trusty plain pastry tips and cut a few more holes. If the bun is dimpled on one side swivel it so the dimple is away from the camera’s lens. But a strawberry that is too shaped funny? There is not a lot you can do about it. You can’t send it to the gym or carve it into the right shape the art director wants. Instead you buy lots and lots and lots of strawberries. The rejects – those that are too big, too small, too light, or who might have a slight bruise – get used as stand-ins or nibbled on as we work with the perfect ones. If we have the time we’ll try to arrange for a food bank pick up at the end of the day, but it’s not always possible. A chef, on the other hand, buys what they need. They minimize waste. It does need to look good, but it also has to taste good, and food costs have to be kept in mind. As a chef I would use all of the strawberries below. As a food stylist I would reject all but the bottom one, and even that one is a bit iffy as a hero strawberry.

As much as I am a food stylist with an eye for the most gorgeous, I am also a former chef who is frugal down to her bones. And the later is why I love to make Angel Food Cake because the former chef in me cannot throw away an egg white. If I make a batch of my Grammy Thompson’s Scandinavian Cookies or whip up my Mom’s hollandaise sauce to dip some steamed artichokes into I always slip the leftover egg whites into the freezer. Yolks won’t freeze, but the whites freeze beautifully. Every time I open the freezer door I eyeball my stash of frozen whites, judging if I have enough to make an angel food cake. I’ve twiddled with Jasper White’s recipe over the years and have found that two cups is the right amount for this classic dessert.
I think this cake would be a wonderful cake to make for Mother’s Day. So if you don’t have a stash of frozen egg whites waiting for you then cook up a load of eggs benedict or something else that uses egg yolks and then get ready to whip up an angel food cake.
Angel Food Cake
1 1/3 cups sifted cake flour (not self-rising)
1 teaspoon salt
2 cups egg whites, thawed to room temperature if they were frozen
1 teaspoon cream of tartar
1 teaspoon vanilla extract
1 1/3 cups sugar
Preheat the oven to 375ºF. You’ll need a 10″ tube pan with a removable bottom. Cut out a parchment paper liner for the bottom of the angel food cake pan since this cake will want to stick otherwise. I usually trace a circle around the insert, then fold the circle in quarters and snip the pointy end so it will look like a giant doughnut and shimmy down the center tube. Do not grease the pan.
Normally I am not too much of a stickler about sifting flour, but for this recipe it is imperative. You sift it before you measure it, then sift along with the salt two more times. You want light, fluffy, aerated flour so your angel food cake can almost take wing.
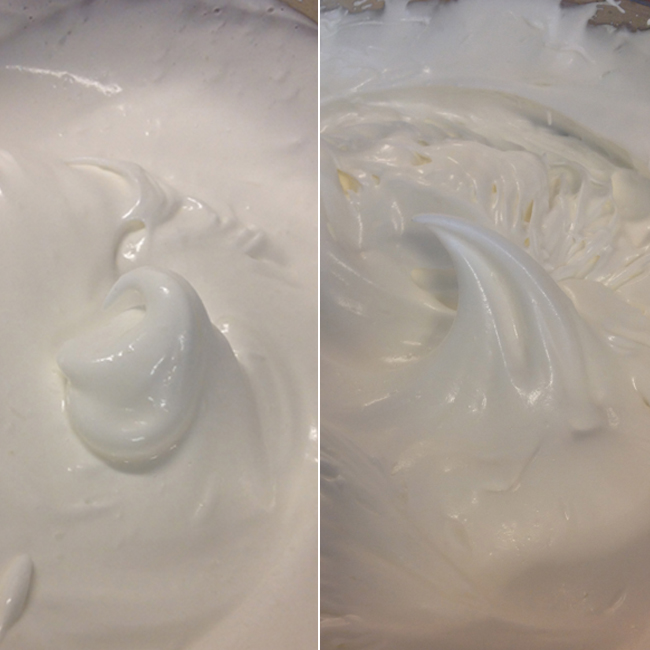
Then it’s time to beat the egg whites. My stand mixer is on the fritz so I did this with a sturdy hand-held mixer. It took almost 15 minutes so be prepared if hand-held is all you have. It should be slightly quicker if you do have a good stand mixer. I cannot begin to guess what whipping this by hand would take. Start by putting the egg whites, cream of tartar, and vanilla into a large mixing bowl. I used my stand mixer bowl since I knew it could hold the volume. As the mixture starts to get foamy slowly dribble in the sugar a few Tablespoons at a time while you continue beating. Keep going until you have stiff, glossy peaks. Do not overbeat.
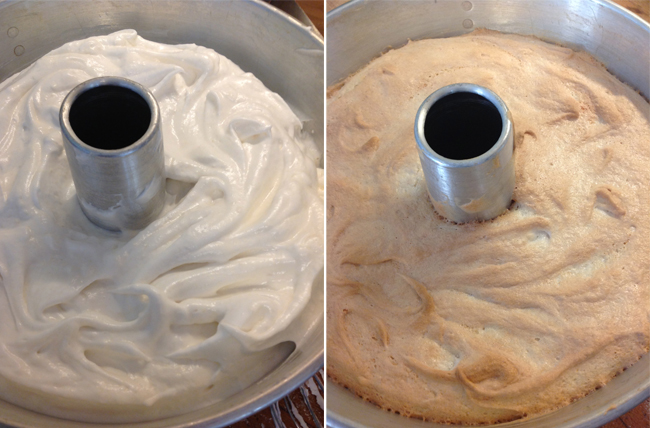
Sift half of the flour/salt over the egg whites and with a large spatula or your hand (remember to take off your watch first) fold it in. Lumpy is ok. Sift the remaining flour/salt mixture and loosely fold that in too. It is a delicate dance of incorporating the dry mixture into the wet while at the same time not loosing too much volume from all the whipping.
Bake 35-40 minutes or until a cake tester comes out clean. Remove and if your pan has “legs” (3 short prongs riveted onto the top edge) turn the cake upside down on these. If not slip it onto an empty glass bottle.
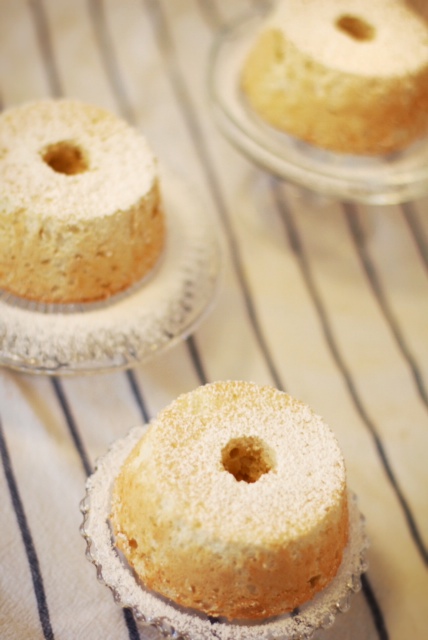
I have some small angel food cake pans which required me to find some tiny things for them to rest upside down on as you can see in the picture. Why does the cake need to cool upside down? I don’t know, but it does.
To remove it from the pan once it’s cool simply slide a very thin paring or butter knife around the outside edge of the pan, with the knife blade slightly angled toward the pan rather than cake. Do the same around the tube in the middle. With a little jiggling the cake should come out and you can peel off the parchment paper.
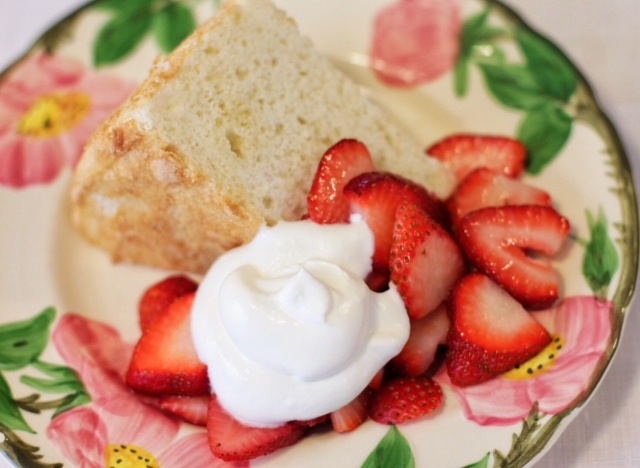
Accompaniments are endless. Macerated* fresh berries and a dab of whipped cream. If you’re making this recipe in late June enjoy a slice of cake served with the Holy Trinity of Fruit. My friend Rick Ellis adds a little powdered ginger to his angel food cake then serves it with peaches which have been tossed with sugar and a shot of bourbon. I personally love a ladle full of stewed rhubarb and a scoop of vanilla ice cream. Whatever you serve it with remember that angel food cake needs to be torn or pulled apart with two forks. If you’re very gentle you can saw slices with a bread knife. A regular knife will just squash it.

*Macerating simply means adding sugar to let the juices come out. If you have strawberries rinse, slice, and toss with a few spoonfuls of sugar. With self-contained berries such as blueberries or raspberries you may need to smush a few in order for the juices to run.


